Wednesday, October 15, 2008

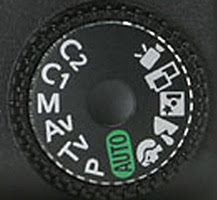
The P-mode in your camera.And the other ones too !


I was negotiating some campaigns with Chanol for their next couture spreads in Morgue, when I received this email on my Ray-Pan glasses :


HI FREDDIE SO I HAVE THIS CAMERA AND FLASH AND OMNIBOUNCE AND I WANNA TAKE SOME PIX WITHOUT USING THE AUTO MODE BECAUSE I READ ON A FORUM THAT IS NOT COOL.SO I SAW THIS P-MODE ON THE DIAL AND I DO NOT UNDERSTAND WHAT IT IS !!1! CAN YOU PLEASE HELP ? KEEP UP THE GOOD WORK, JOHNNY PEPPERONI.


Hi Johnny Pepperoni.NO worries for those modes since they are all very easy to understand, except if you live in Japan as they can't read what's on the damn cam.Each one has a specific purpose and after shooting sea gulls for a couple of weeks you will have no issues getting sharp shots without using the spray and pray technique.Specially for you I told Chanol to hold on a couple of minutes and give you some insight :


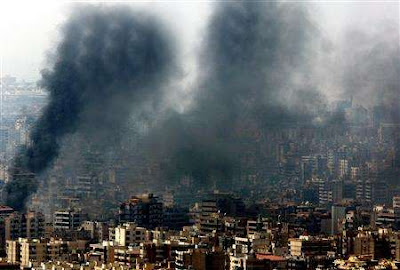
AV = ANTI VIBRATIONS. When you shoot in AV mode your camera will start to shake as if Shakira is recording her first video, adjusting itself to the scene and therefore preventing you have a blurred image.This mode is mostly used by the Leuters guys when shooting war zones, as you know they too are big fans of the clone tool and follow our philosophy of ' some cloning and levels ' is what PS is all about :


M = More Megapixels.This mode has a secret piece of sensor involved that will boost up your images for a megapixel or two.This will encite you to buy a new camera 8 months later since megapixels are what photography is all about since it became digital.There's nothing more justifying paying 2500 dollars again like images that are 500 pixels wider, think about the cropping possibilities.

TV = TOTALLY VECTORISH.This mode is only used by graphic designers shooting their dinner tables from underneath in order to get textures for grungy wallpapers and paint them over their goth and emo girlfriends.The images are directly delivered in vectors so that way Adobe sells more copies of Illustrator and Indesign.

P = PROFESSIONAL.This is the ultimate camera mode as the camera will always set you up with an inadequate exposure and you will have a fraction of a second to correct the whole thing.This is the mode where playschool is left behind as you will have to over or underexposure all your shots.You can become an EXPLORER OF LIGHT with Panon if you push the limits by using the speedlites on ETTL mode, then you're really showing Annie Flashobitz got nothing on you and Flashers Bazaar better starts calling for some jobs.

The rest of the modes are just translations in Egyptian so just ignore them.

You can download a tutorial specially designed for mobile devices - as all pro's check their mail for new Flickr comments via their phone every 4 minutes - here:


hope this helps, back to Chanol now since they're calling long distance.

Freddie

Tuesday, October 14, 2008

Fake Chuck Westfall Insider Tips

When Canon gave me a call to shoot and shop some of their ads for the next 15 years, I ran across Fake Chuck Westfall, a very nice guy shooting Britney Spears concerts with his 1d mark III on ai servo all the time.

Chuck is very busy testing the Canon 1ds mark IV at the moment shooting the space station of Mir from the Chinese Wall with his 50 000 mm f/2.8 lens yet he finds some moments between breaks to share the knowledge and top insider tips at http://fakechuckwestfall.wordpress.com/

Chuck told me he would get me the 1ds mark IV to shoot those new ads so I was obliged to link him up here.

Photography Tips : THE RULE OF THREE THIRDS

Okay so I have all these n00bs mailing me asking me what the hell the rule of three thirds is and all so here it goes.

HI FREDDIE I JUST BOUGHT A CANON XSI AND I WANNA TAKE SOME COOL PIX.NOW THE GUY THAT SOLD ME THE CAM TOLD ME TO ALWAYS SHOOT WITH THE RULE OF THREE THIRDS.SUP WITH THAT FREDDIE.GREETINGS FROM GUSTAF AL SHARAF


Oh Hi there too Gustaf Al Sharaf, and congratulations with your camera from last century.
First off Gustaf, as you should know from all the forums on the net, you need to buy a new cam every 10 months, otherwise your pix will always suck, of course this is a trick only the pro's and forographers never shooting pix know and since you're a n00b you're forgiven, so now, sell your cam to another n00b and buy a 5d mark II or a D 700 because they're new cams the coming 56 days, and if you have it with a white lens on top of it you will get into all concerts and sport arena's. Not even the president of the club playing nor the lead singer will doubt you're a pro and will sign your t-shirt right away including the phone numbers of the groupies.If you buy the 1ds mark III cam and carry 50 speedlites you will even get into the VIP and everyone will think you shoot for SI, CNN, BBC and AP at the same time.They will also give you free snacks and wine as all pro's need a break between making historic shots.

So, for all the guys with new cams doing backfocus tests, here goes the RULE OF THREE THIRDS.


1/3 + 1/3 + 1/3 = 3/3


To have a paid pic you need something to shoot (1/3) , somewhere to shoot it (1/3) , and a client to pay the damn thing since my bowling hall job pays just my rapidshare account to download games (1/3) .You need these three thirds in order to have a working shot, otherwise you will just spend 5000 $ on gear and shoot birds and flowers.


You can download my RULE OF THREE THIRDS tutorial below for future reference :


Content Aware Scaling in Photoshop CS 4 Tutorial and Workflow

Of course I'm already rendering in CS 5 as you know , but this is about the CS4 version, implementing the so-called CONTENT AWARE SCALING option, which sounds like a weird bank account, but really is very cool.

As I was typing this John Wayne Jr. shot me an email (haha shot me an email ) asking me to resize some of the shots used in the western When The Deputy Shot the Sheriff Twice In the Head , as they are going to be projected on the Moon for a couple of days as part of the promotion of the remake ( though calls with Gorge Zucas have been made for a sequel or 7 too)

As a demonstration here follows an image that could use some of that scaling :


What we have here are two peaks and just what we need since we're going to content awarely resize our image here after some cloning and level commando's that are just what Photoshop was made for, the rest just tries to justify the price of the rapidshare account you ordered to download the proggie.

Of course I work on only one layer since layers are for n00bs and cakes.

Now, going to FILTER , RENDER , CONTENT AWARE SAVINGS I get this menu full of options, which are there just to distract you, all pro's know that after some good cloning and levels all you need is press AUTO and save your image in Adobe RGB since then the client will KNOW you're a PRO and not to be messed with. Public secret is that if you deliver in ADOBE RGB the client will not wait those three months or years to pay.


So, after such workflow we get the image John is looking for ready for projection on the Moon here:


The filter is very smart, it is aware some dude called James Jameson is hiding behind those peaks with some green alien fish and since the resizing would take out that data now it's there for everyone to see.Ho ho , if they only knew back in the days the movie was shot, they would prolly have held some bbq's and shot a sequel to the movie X-files with Gorge Zucas senior.

Photoshop like a pro with Freddie

Ok, so I have this client Stevo Spolbergo from Italy that just shot a movie with cats going all Ahnuld Seagull 'n all and he told me to design the movie poster since I stole his plugin filters last year when filming Indo Jones and Co, best known as Indo Cojones.

So as a sneak peek you can see some of the process.

Stevo mailed me this pic


Obviously the clone tool and levels command come in handy for such jobs, but first things first.Take a strawberry chewing gum and put it on your screen after chewing for 5 minutes.This will provide color consistency in your reds, and everyone designing and printing movie posters for Stevo knows reds are crucial, so crucial the green cross had to rename itself the red cross and had to paint theirs red too with a soft edged brush.

So this is the final result after some cloning around and using the magic filter I posted about previously.


This took me some heavy cloning and three liquify layers, yet the secret lays in going to EDIT FILL and fill the whole thing with textures of Michelle Pfeiffor

Here's a layer structure before flattening the image :

Disasters Photoshop's Freddie here analyzing da stuff

Ok, so my office at the the Bowling Hall's kitchen is closed as it will be X-mas soon and we get some vacation as lots of Taco's get ordered that day and it's my turn to do the cleaning as usual, so now Adobe has their CS5 package and Gorge Zucas his render, it's time to analyze an image of a famous photographer, Mario Testiclo, a photo of a white angel shot on a seamless background using high-key and 789 flashes as that looks very pro :


Now, Testiclo does have a lot of sensor dust but his Nikon D-897000 has a custom function that is called BLOW EVERYTHING THE HELL OUT ITS VERY ARTIZTIC , on internet forums they call it HIGH KEY or 5-LAYERS-O-CURVES.


So, while Testiclo is shooting for magazines such as Morgue and Flashers Bazaar along with top-notch celebs such as Pipney Fears and Pisces Clinton, he too can't be freed from the thorough analysis I need to make before I jump out to the bowling hall for some taco orders.


Photoshop CS 5 is out !!!1!11!!

Of course you n00bs won't see it until rumours on forums have been posted for like 86 months , but since my middle name is Dan00be and Adobe likes that they sent me a couple of dvd's right here for me to test around and put on rapidshare.

So, without further delay, here's the first photoshop CS 5 review evar.Discussing all the new tools and so would be a waste of time as everybody only uses the clone tool and the levels command so best impact thing would be - no not another of my 4d renders - a final photo shopped around from a lousy original.

Original photo :


Now here we see that this image has SOME artifacts on the corners and a red color cast, some abberation and some other stuff everyone hates because the poster before him does too - unless the photo is 25 years old and oveexposed, which then makes it ART - , so I decided to pop out the new CS 5 and use the following workflow :


- open PS CS 5 and a bag of Skittles

- call Bowling Hall I'll be 26 minutes late

- pop out the levels command and click on AUTO

- look for the clone tool and click 26 times with one eye closed while pouring a martini in my lunch-box

- put my mouse into my firewire port and reboot the computer holding the apple key pressed ( this is a magic filter, using windows when you don't wanna pay 2500 dollars for a computer box, you need to press alt + f4 while turning your mouse 360 degrees counterclockwise having the liquify filter open )


- IMAGE READY ( I always screamed that when I was an engineer at Adobe, they even named a program after it since I payed the last 50 rounds o' Donuts, until they heard a cd of Paul Garfunkel and named it BRIDGE )


My fingers are tired after that 4-cpu render and typing invoices to Zucas, but here's a sample for Adobe, they will prolly use it on the package of CS5, if they pay enough for the rights and get me a new pink bowling ball, gotta love pink bowling balls :

by Freddie